A custom diamond painting lets you turn your personal photo into a handmade artwork using tiny resin drills. Instead of a generic design, your chosen image becomes the canvas. From pet portraits to family photos, every memory can be transformed into a photo diamond kit. At Trendy Diamond Painting, we create detailed patterns from your pictures and include everything you need to complete your personalized diamond art. The result is not just a craft project—it is a lasting memory you build yourself, one sparkling piece at a time.
Why Choose a Photo to Diamond Painting Kit
A photo-to-diamond painting kit turns a personal memory into something you create with your own hands. That process builds a deeper connection to the image. It is not just printing a photo—it is reliving it, piece by piece.
Gifting a diamond painting from a photo holds more meaning than a framed picture. It shows effort, thought, and time.
Why it stands out:
- Long-lasting and durable
- Emotionally engaging to create
- The finished result doubles as home décor
With a custom diamond art kit, the memory becomes something you do, not just something you look at.
How a Custom Diamond Painting Kit Works
Creating a custom diamond painting kit starts with your photo and ends with a unique piece of art you build yourself. Here is how the process works from start to finish:
1. Upload Your Photo
Choose a clear image—portraits, pets, or simple backgrounds work best. Once uploaded, your photo is reviewed for quality and clarity.
2. Image Conversion
We convert your photo into a pixel-style grid using specialized software. Each square on the grid matches a color-coded diamond.
3. We Build Your Kit
Your custom diamond painting kit includes:
- A printed canvas
- Color-coded diamonds (round or square)
- Applicator tools and wax
- Easy-to-follow instructions
4. You Complete the Artwork
You place each diamond according to the pattern. There is no rush. Work at your own pace, and enjoy watching your photo slowly come to life.
From upload to the final result, the process is simple—but the outcome is always personal.
What Photos Work Best for a Diamond Painting from a Photo
Not every image is a perfect fit for a diamond painting from a photo. Because these artworks rely on color blocks and small resin drills, the clearer and simpler the image, the better the final result. If the photo is too crowded or blurry, important details may get lost during the conversion process.
Here is what works best for a custom diamond art kit:
Portraits (individual, couples, pets)
Close-up portraits bring out the most detail. Whether it is a person or a pet, facial features become clearer on the canvas when the photo has good lighting and a clean background.
Landscape or travel memories
Photos of mountains, beaches, cityscapes, or iconic locations work well—especially if there is a clear subject in the frame, like a person or a landmark. These make great decor pieces.
Wedding, baby, or family moments
Captured life events with emotional value become even more special when turned into a photo diamond kit. Just make sure the photo is not overcrowded and the faces are visible.
Avoid: Blurry images, busy backgrounds
Dark, pixelated, or low-quality photos may not convert well. Images with too many people or distracting backgrounds often lose clarity when transformed into diamond patterns.
Ideal photo ideas:
- A pet sitting calmly
- A smiling couple on vacation
- A baby’s first photo
- A wedding day close-up
- A favorite travel selfie in good lighting
For the best results, choose images with strong contrast, minimal clutter, and one main subject in focus.
Size Matters in Personalized Diamond Art
When it comes to broderie diamant personnalisé or custom diamond art, canvas size plays a big role in how your final piece looks. The size you choose directly affects how much detail shows up in the finished design. A small canvas might lose facial features or background elements, while a larger one can capture every tiny detail.
Larger diamond painting canvas sizes offer more space to map out color transitions, shadows, and fine lines—especially important in portraits or complex backgrounds.
Recommended sizes:
- Portraits (single subject): 30×40 cm or larger
- Family or couple photos: 40×50 cm or more
- Landscapes or travel shots: 50×60 cm and above
If your image has multiple people or background detail, bigger is always better. For simpler images, a smaller size still works, but expect less definition.
Choosing the right diamond painting canvas size ensures your custom art from photo looks clean, clear, and worth every minute spent creating it.
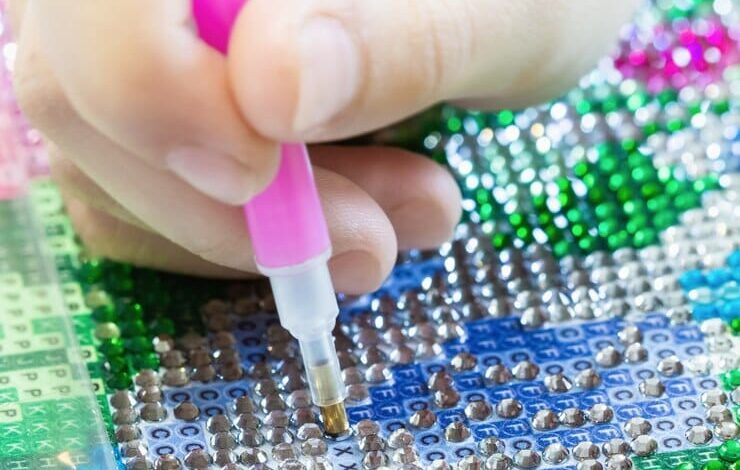
Square or Round? Choosing the Right Drill Type
When ordering a custom diamond painting kit, one of the key decisions is whether to go with square or round drills. Both types offer unique results, and the best choice depends on your goals and experience.
What are Square Drills?
Square drills are tiny resin tiles with four straight edges that snap tightly together on the canvas. They cover more surfaces with no gaps, creating a sharp, detailed finish—especially useful for complex images or larger diamond painting canvas sizes.
What are Round Drills?
Round drills are small circular beads. They are quicker to apply, easier for beginners, and leave a slightly softer look with tiny gaps between each drill. This gives the piece a hand-stitched effect, ideal for simpler or quicker projects.
Pros and Cons of Square vs. Round Drills
| Feature | Square Drills | Round Drills |
|---|---|---|
| Finish Look | Clean, grid-like, gapless | Softer, slightly spaced |
| Level of Detail | High – ideal for complex or larger photos | Moderate – better for simple images |
| Ease of Use | Takes more precision and time | Easier to pick up and place |
| Speed | Slower to complete | Faster to finish |
| Best For | Experienced users, detailed portraits | Beginners, casual or quick projects |
Choosing the right type of drill can shape the overall feel of your custom diamond art kit. Go with square for detail and precision, or round if you prefer speed and ease. Both give you a satisfying way to bring your custom art from photos to life.
Tips to Get the Most Out of Your Custom Diamond Painting Kit
Working on a custom diamond painting kit can be relaxing and rewarding—especially when the final piece is your own photo turned into art. A few simple steps can make the whole process smoother and more enjoyable.
Here are some helpful tips to keep in mind:
● Use a Flat and Clean Workspace
Pick a spot where your canvas can lie flat without dust or clutter. A steady surface helps you avoid mistakes and keeps your custom diamond art kit clean.
● Start from One Corner
It is best to begin from a top corner and work your way across. This prevents smudging and keeps your hand from sticking to the glue.
● Keep the Canvas Covered
Only peel the protective film a little at a time. Leaving too much exposed can reduce the stickiness and attract dust.
● Organize Your Drills
Use small containers or zip bags to store your diamonds. Label them clearly by number or symbol. This saves time and keeps your diamond painting from photo stress-free.
● Use a Light Pad
A light pad placed under the canvas makes symbols easier to read. This is especially helpful with darker colors or fine detail.
● Press the Diamonds Down
Once a section is done, use a roller or book to press down gently. This helps all the drills stick firmly to the glue.
● Seal the Finished Canvas
When your artwork is complete, consider sealing it. A sealant adds a layer of protection and keeps the drills in place long-term.
● Frame It with Care
Choose a frame that fits your canvas size. Framing your photo to diamond painting keeps it safe and ready to display.
Taking a little extra care goes a long way. These small habits will help your custom diamond painting kit last longer and look even better when finished.
How to Order Your Custom Diamond Painting from Trendy Diamond Painting
Getting your own custom diamond painting is simple. At Trendy Diamond Painting, we guide you through each step so you can turn your favorite photo into a one-of-a-kind artwork.
Here is how to order in just a few easy steps:
- Choose Your Photo: Pick a clear, high-quality image. Portraits, pet photos, and special moments work best. Make sure the subject stands out and avoid blurry or dark photos.
- Upload the Image: On our website, use the upload tool to send us your photo. Supported formats include JPG and PNG. Once uploaded, our team reviews the image to ensure it fits well for a photo to diamond painting.
- Select Canvas Size: Choose a canvas size that matches the detail level you want. Larger sizes show more detail, especially for faces and background elements.
- Pick Your Drill Type: Decide between round or square drills. Round drills are easier and faster. Square drills offer more coverage and cleaner lines—ideal for sharper finishes in your custom diamond art kit.
- Confirm the Preview: We provide a digital preview of your converted photo. This gives you an idea of how your final diamond painting from photo will look.
- Place Your Order: Once you are happy with the preview and options, complete your order. We prepare your kit, pack it carefully, and ship it to your door.
Ordering a custom diamond painting from Trendy Diamond Painting takes just a few minutes—but the memory you create lasts much longer.
Each kit is carefully made to match your chosen photo, with all the tools you need to bring it to life. Whether it is a gift or something personal, the experience of placing each drill makes the artwork more meaningful. You are not just ordering a product—you are creating something that holds real value. With Trendy Diamond Painting, every moment becomes a piece of art worth keeping.